A NAS device is a form of storage that has been adapted for multiple different users to simultaneously access files from different devices on a network. Naz stands for Storage net attached
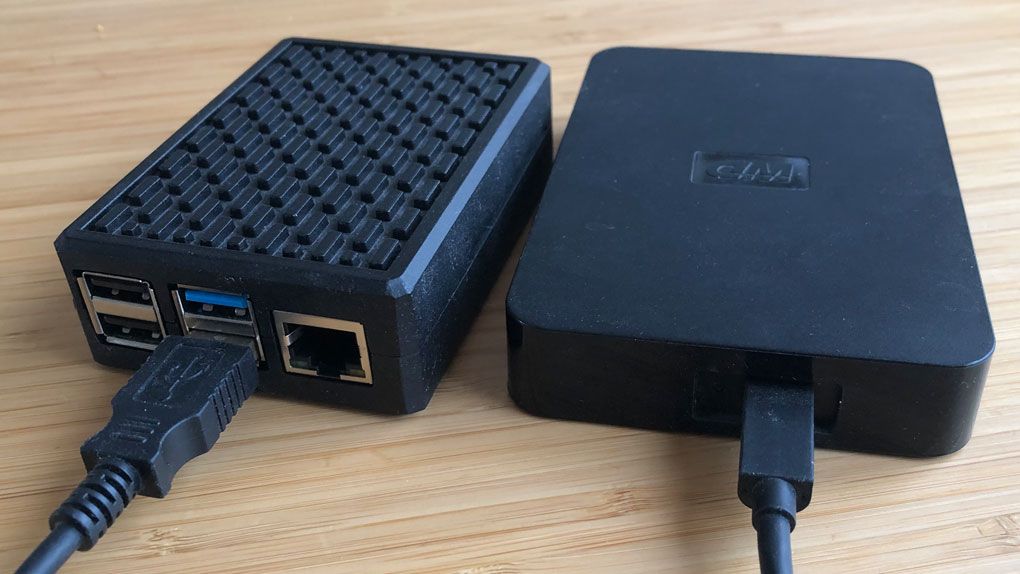
If you want a NAS unit but don’t want to pay the high prices of most “real” products, it’s possible to build one yourself for much less. Namely, it is possible to create your own NAS using a Raspberry Pi and one or more external hard drives. It’s not particularly complicated, and if you have a hard drive that’s more or less gathering dust, you can reuse it. Otherwise, you can buy a new one, and it will be much cheaper than a real NAS unit.
Hardware you need:
Raspberry Pi – We recommend a Raspberry Pi 4 with at least 4GB of memory for best performance
the structure
Power adapter or USB-C cable and charger
ethernet cable
Micro sd card for the operating system
SD card reader and adapter for micro SD cards
external hard disk
do not miss: Create your own media center with the Raspberry Pi
Some restrictions
Before powering on and purchasing a Raspberry Pi and hard drive, we must point out that the solution we describe is not 100% comparable to standard NAS devices. The performance is not high, but above all, it does not support multiple hard drives connected to the raid. Many NAS units combine multiple disks with raid 5 or zfs file system for example to provide faster transfer speeds than a single disk and higher reliability where sometimes one or two disks can fail without losing data.
Our recommendation if you store important files on it that also aren’t located elsewhere is to get another hard drive to back up the first one.
suitable hard drives
Any USB hard drive should really work, but we recommend using one with an external power supply. The Raspberry Pi may have problems supplying power to some USB portable hard drives, which can lead to file corruption. An alternative is to connect the USB hub to an external power source and connect your hard drive to it.
There is no point in using an SSD because the network will not be faster than a hard disk. If you have one unused you can of course use it and then you don’t need any external power because ssds are less power hungry than magnetic hard drives.
picture: ArgonLuxurious style with a custom built body
Following the success of the Kickstarter project, the Argon Eon, the first NAS chassis designed specifically for the Raspberry Pi, was launched. It is sold by, among others electrokit In Sweden and a little cheaper (even with postal and import VAT) than through my hut in Great Britain. At the bottom of the chassis you can fit a Raspberry Pi 4 Model B, and on top of it are up to four hard drives (two 3.5-inches, two 2.5-inches). Today there are hard drives up to 20TB (3.5″) and 5TB (2.5″) so you can get a maximum of 50TB in the Argon Eon.
Install the system
Since you don’t need a monitor attached to your NAS, the standard Raspberry Pi OS Lite version works just fine. The easiest way is to use the program Raspberry Pi Imager . Choose Other, Raspberry Pi OS Lite (64-bit) ssh gear wheel
After the program finished writing and testing the sd card, insert it into the Raspberry Pi, connect it to the router with an ethernet cable, and connect the power cable to boot. The red LED will come on and after a while the green one will hopefully come on too. It can then blink the frequency, indicating that it is reading or writing data to the sd card.
Then connect to it via ssh. Windows 10 and later have ssh built in, which you can access in Windows Terminal or Powershell. Enters:
ssh [email protected]
If everything works as it should, you can enter the password you chose above (or consent to the connection if you chose to log in with the rsa key). If it doesn’t work, it might be because it can’t find the IP address. You can then see if you can see your Raspberry Pi among the connected devices in the router’s web interface (it may be under dhcp settings or in a separate section for connected devices).
Openmediavault for easier sharing
You can continue to set up and repair a working network drive yourself at the command line, but it’s neither very easy nor efficient, and it can make a lot of mistakes. Fortunately, there are already ready solutions for setting up and running file servers. Openmediavault is an open source project built for just that, optimized for small office and home use – which is exactly what we’re dealing with in this guide.
To install it, simply login via ssh as above and run one command:
sudo wget -O - https://github.com/OpenMediaVault-Plugin-Developers/installScript/raw/master/install | sudo bash
This downloads and runs an installation script from Omv-extras, a group of developers who make many plug-ins for Openmediavault but have also produced this script to automate installation on the Raspberry Pi. Installation takes a while, so you can have a coffee while you wait. When finished, the system restarts, which is also what you see when the ssh session ends.
Basic settings
The next step is to log into the Openmediavault web interface, where you will perform the rest of the settings, manage system updates, and other things. Enters raspberrypi. local supervisor openmediavault Change the password
Now it might be a good idea to choose a static IP address, so you can always find the settings if raspberrypi.local doesn’t work. You can either set the router to always give the same IP address to the Raspberry Pi via dhcp or change to a static address below network interfaces eth0
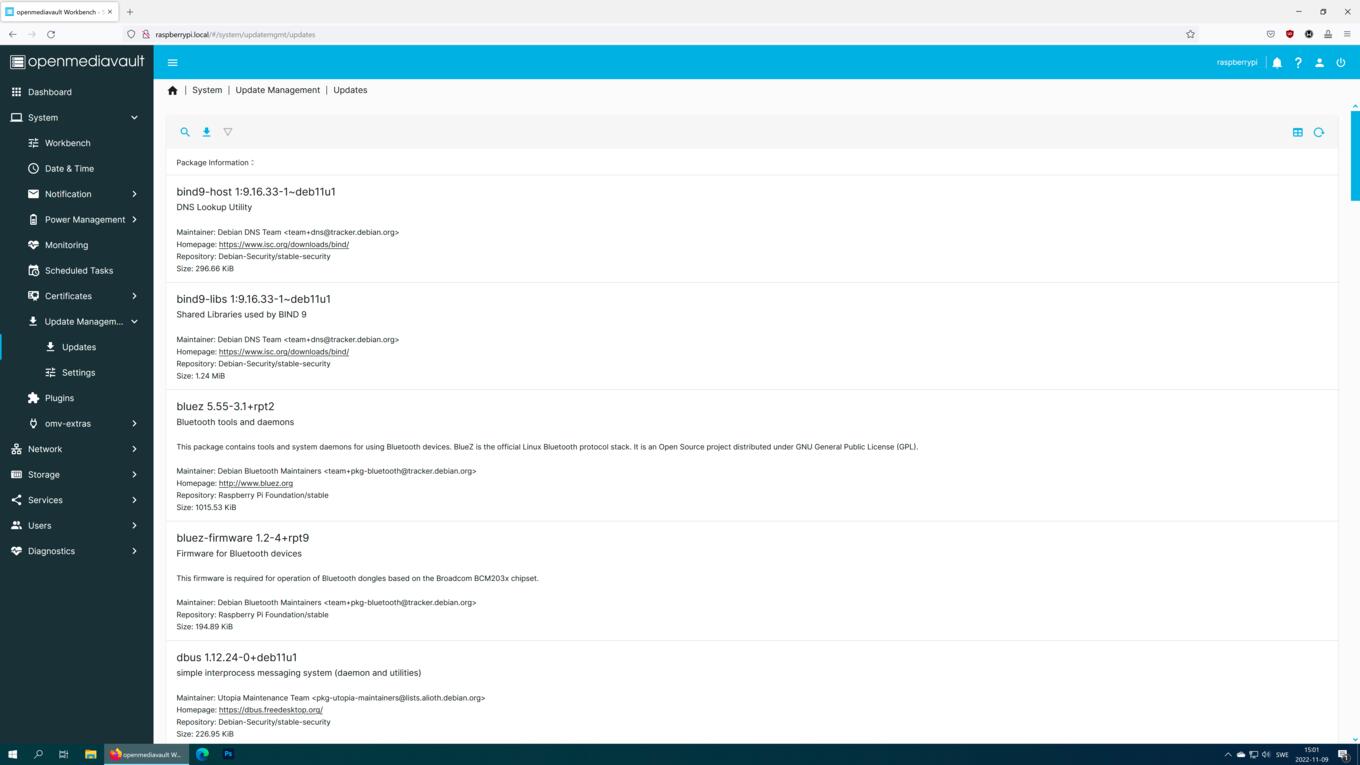
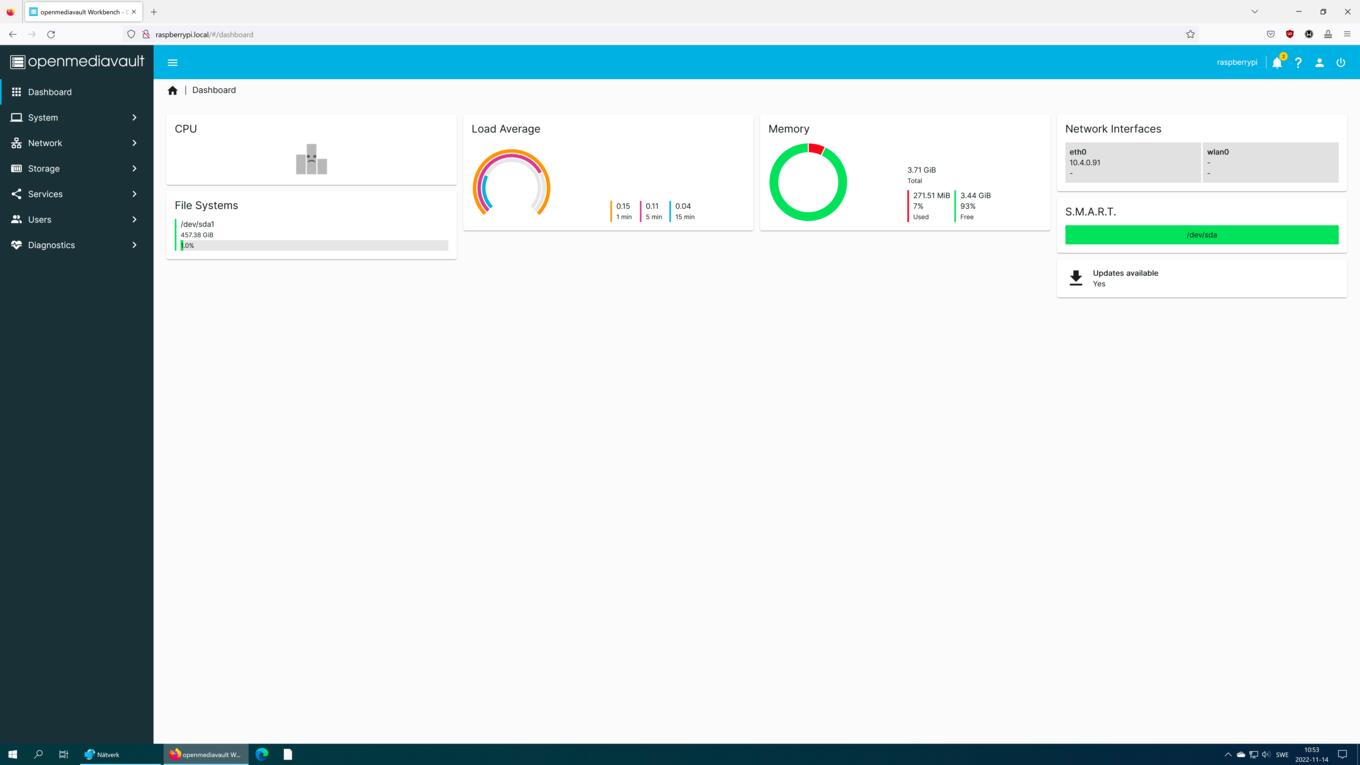
Next, we recommend installing the available updates. Choose System, update, management, updates Installations
when you click Dashboard
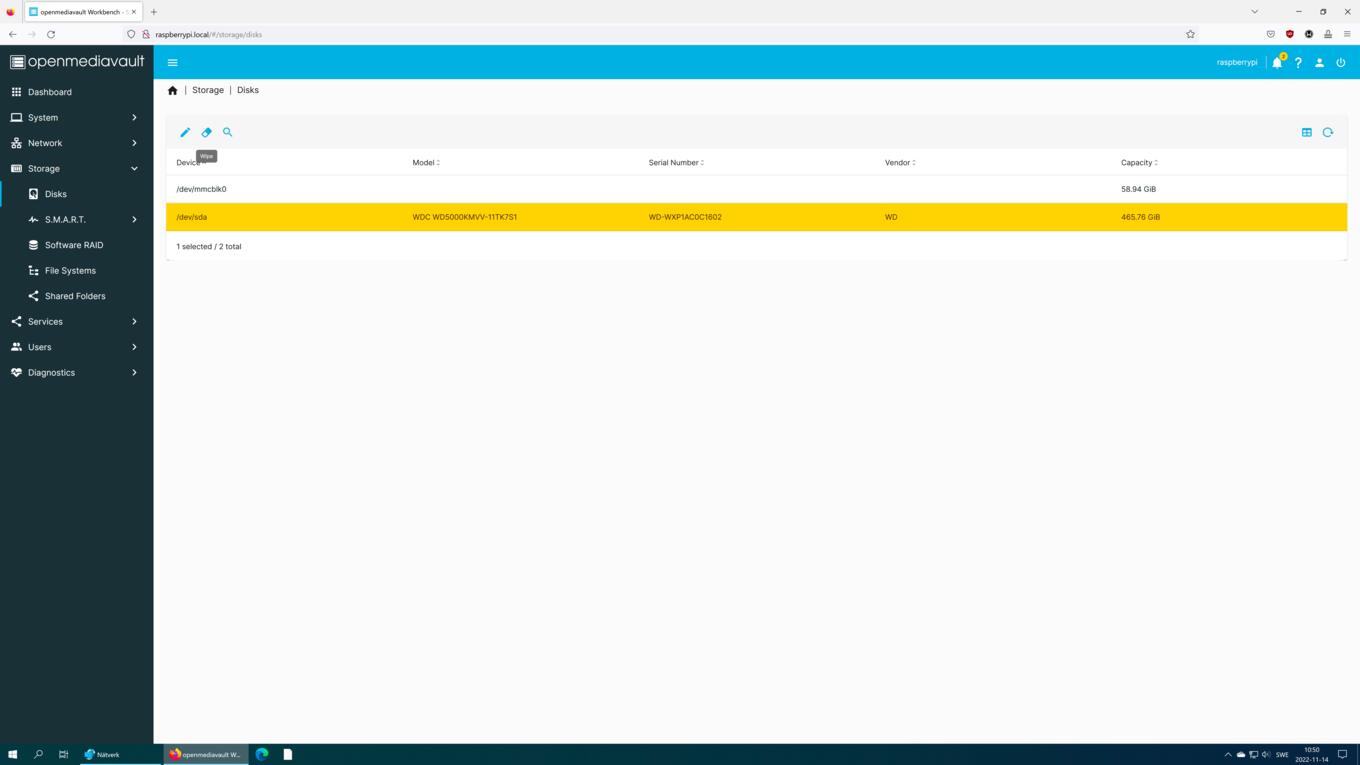
The next step is to format the hard drive and start partitioning it. Choose storage and disks / dev / sda / dev / sda / dev / sdb eraser button
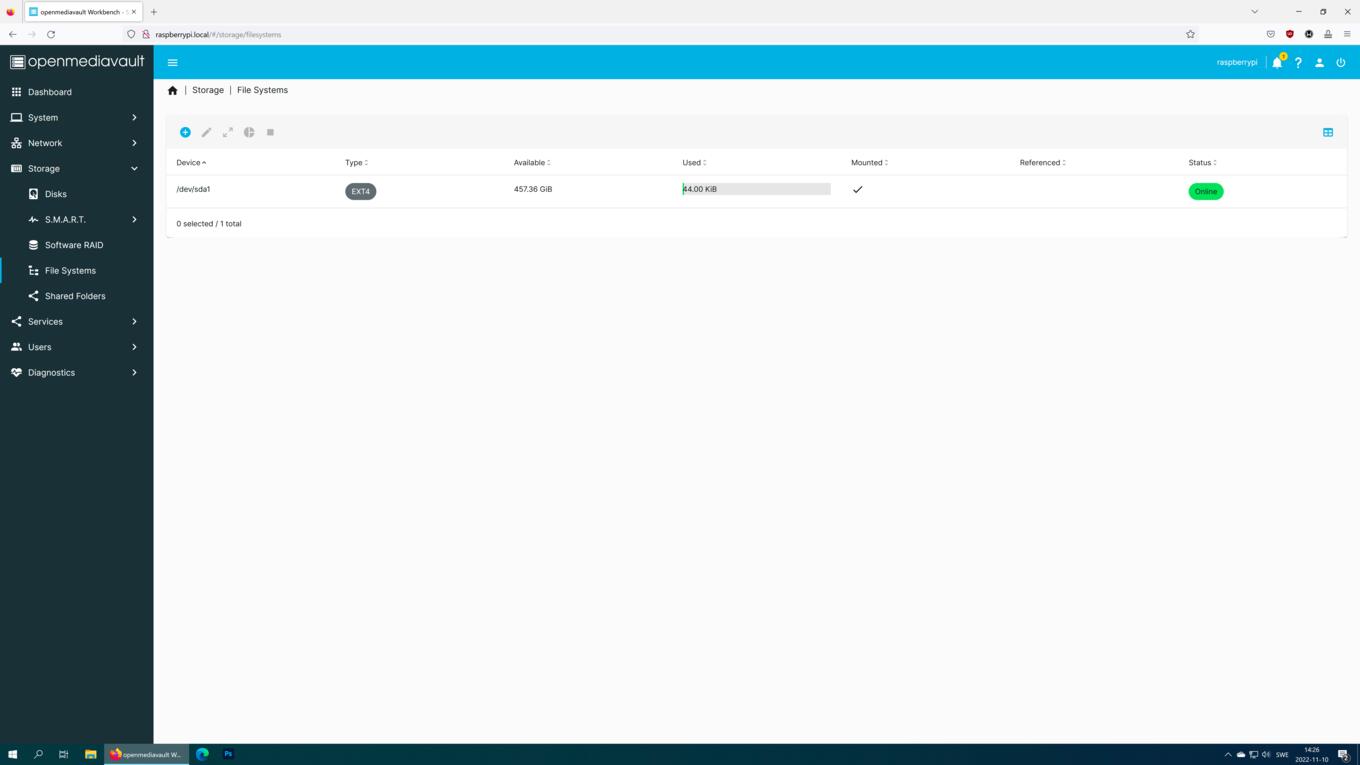
Then go to file systems plus button Create
Formatting can take some time. Then you have to select the disk again in the next step, choosing how full the disk is before the system warns. Click Save and choose to mount the file system.
After every configuration change like this, you also have to apply the changes, which the system notifies you of in a big yellow warning. Click on the mark on the right. The same warning will appear multiple times – click the checkmark each time to apply the change so that it appears in the next steps.
Create shared folders
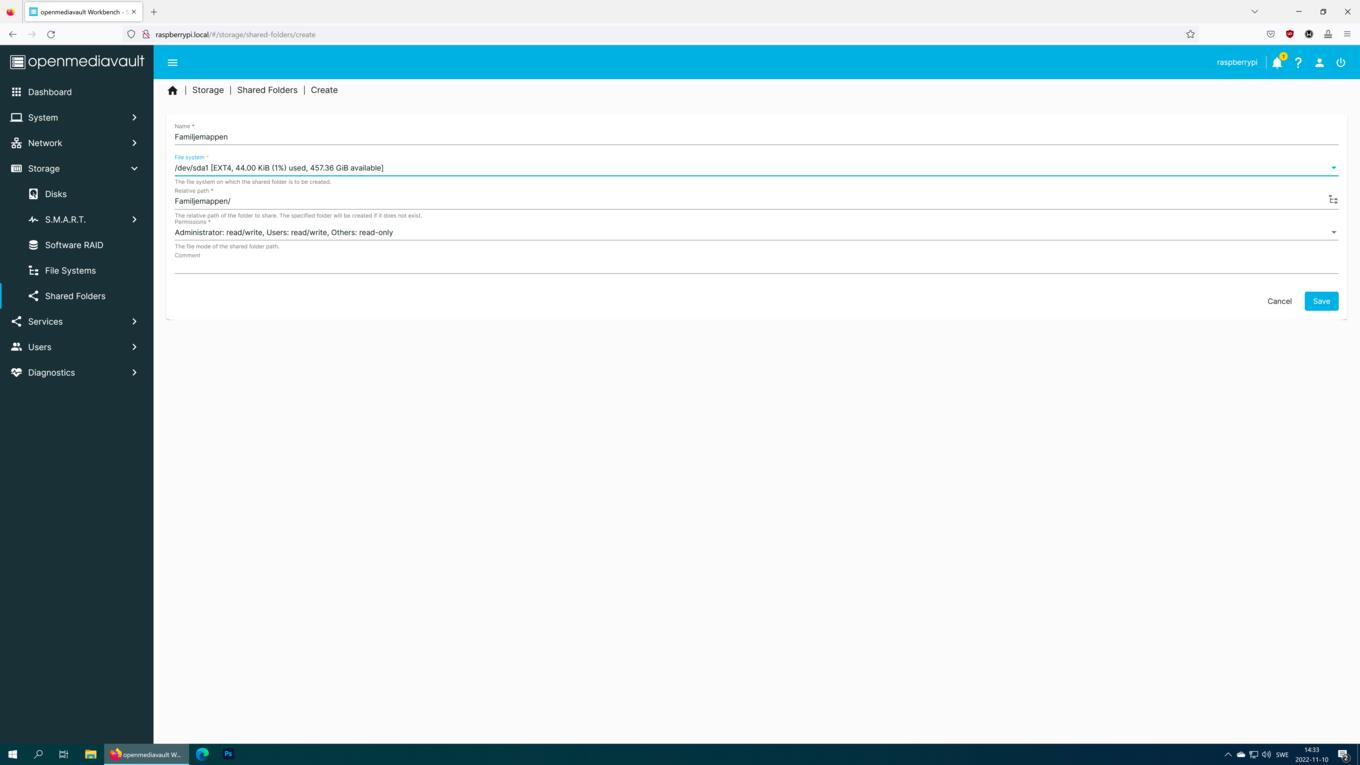
Now it’s time to create at least one folder that will be shared on the network. Choose Shared files storage plus button
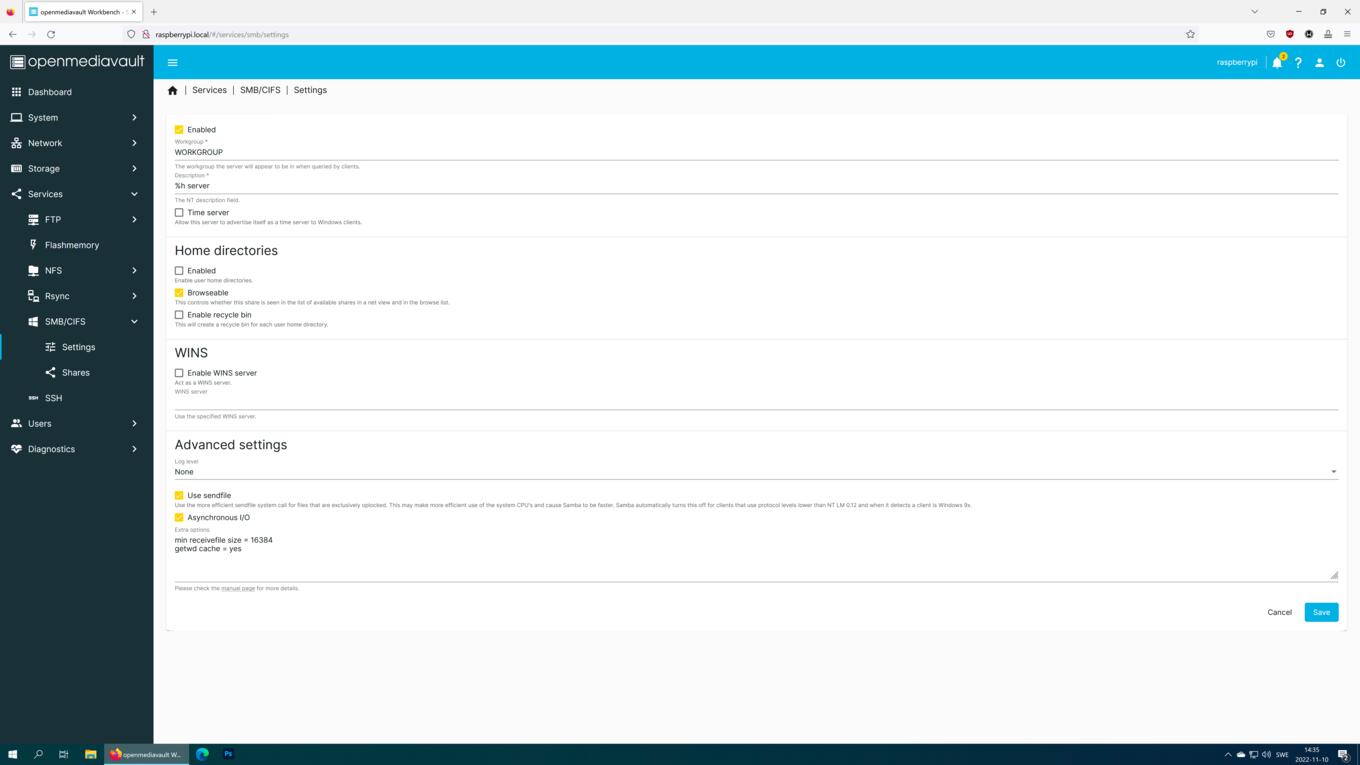
go to the Services, SMB / CIFS, Settings maybe
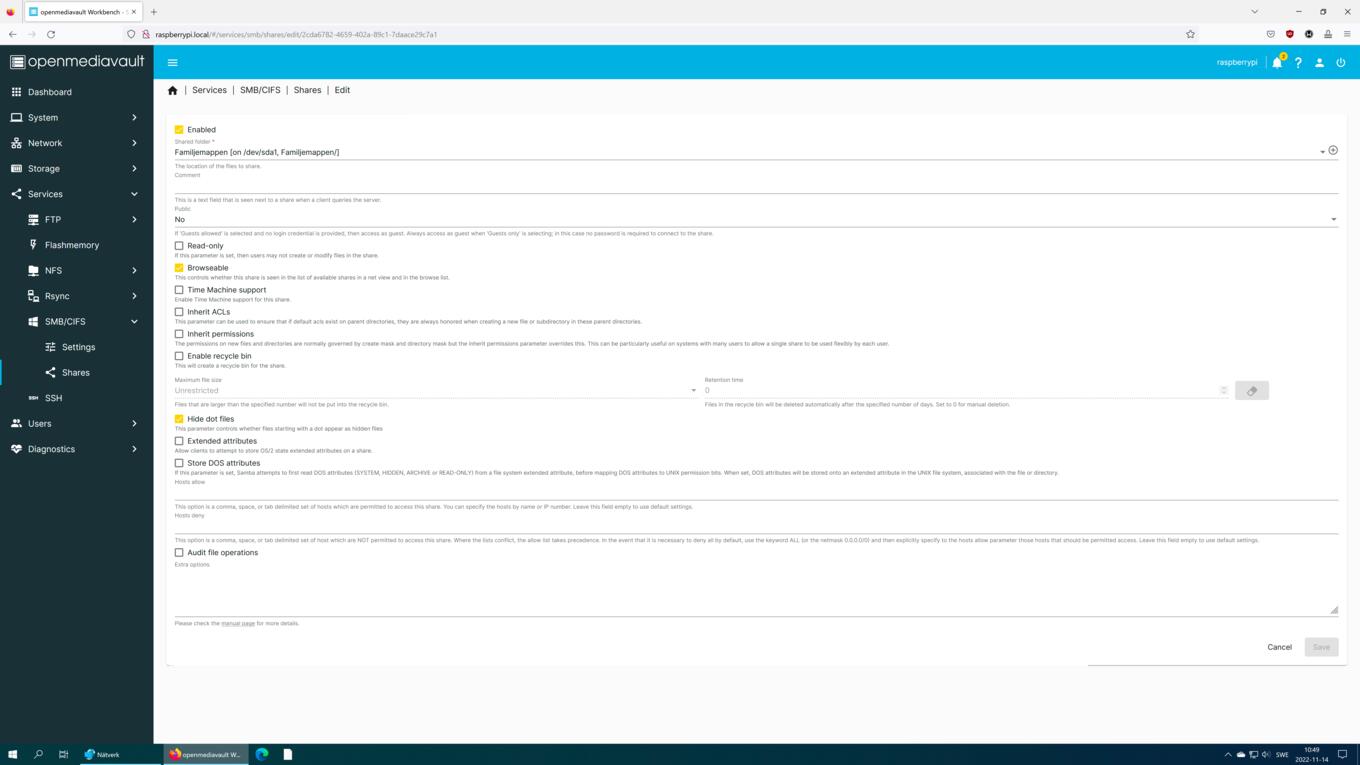
Then go to Involved plus button
users accounts)
Before anyone can connect to the shared disk, you need at least one user account. The system has a default account (“pi”) but it usually doesn’t have a password and you shouldn’t use an administrator account for things that don’t need administrator rights, such as file sharing.
Choose Users and Users plus button
Now everything should be ready to start using the shared disk.
Connect from PC
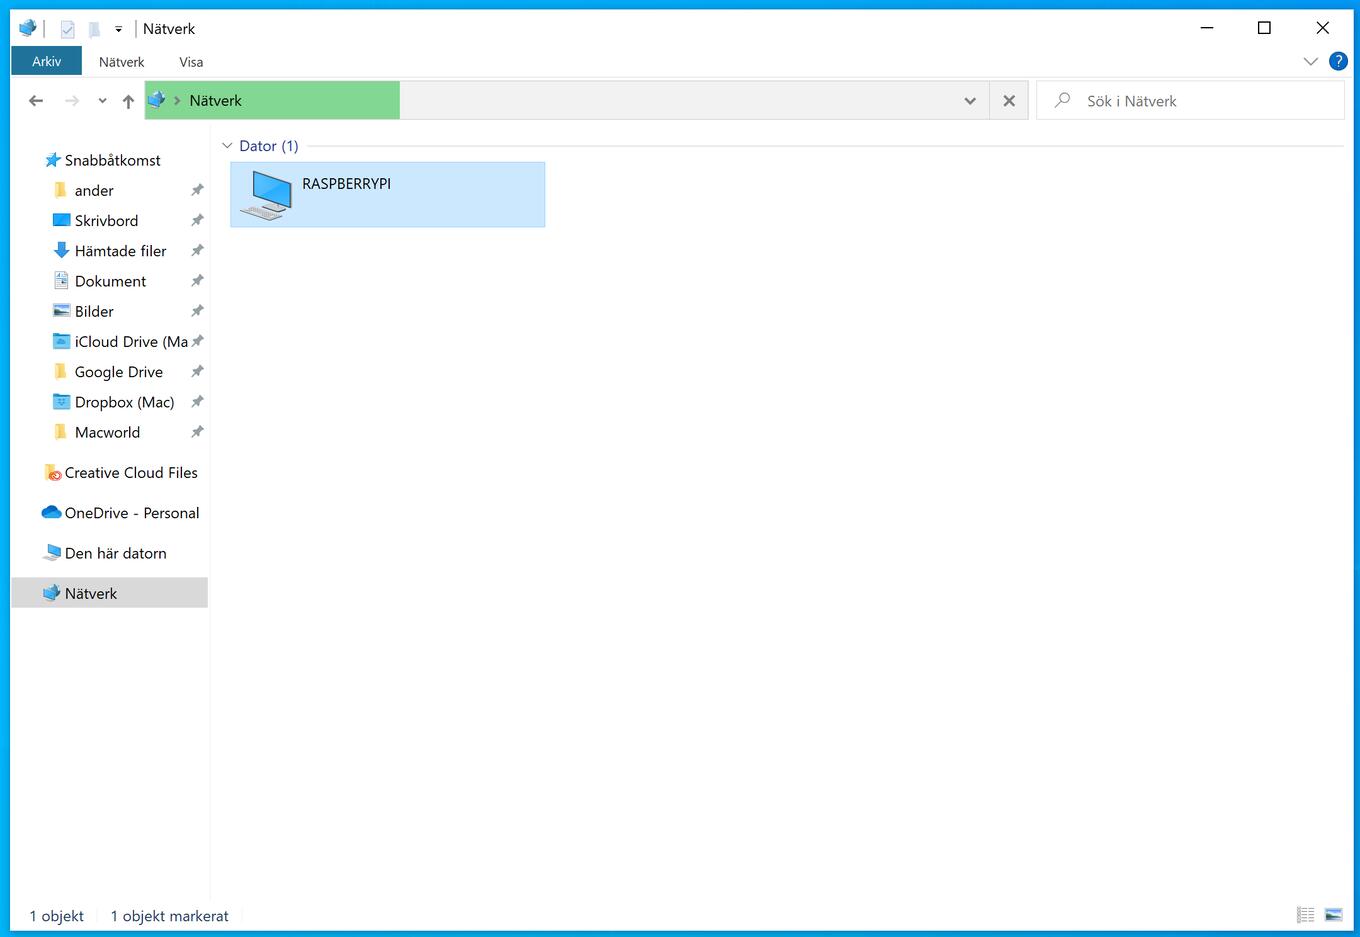
To connect to the shared disk on a Windows PC, you can first see if it has appeared automatically under Network. it’s called Cut the berries
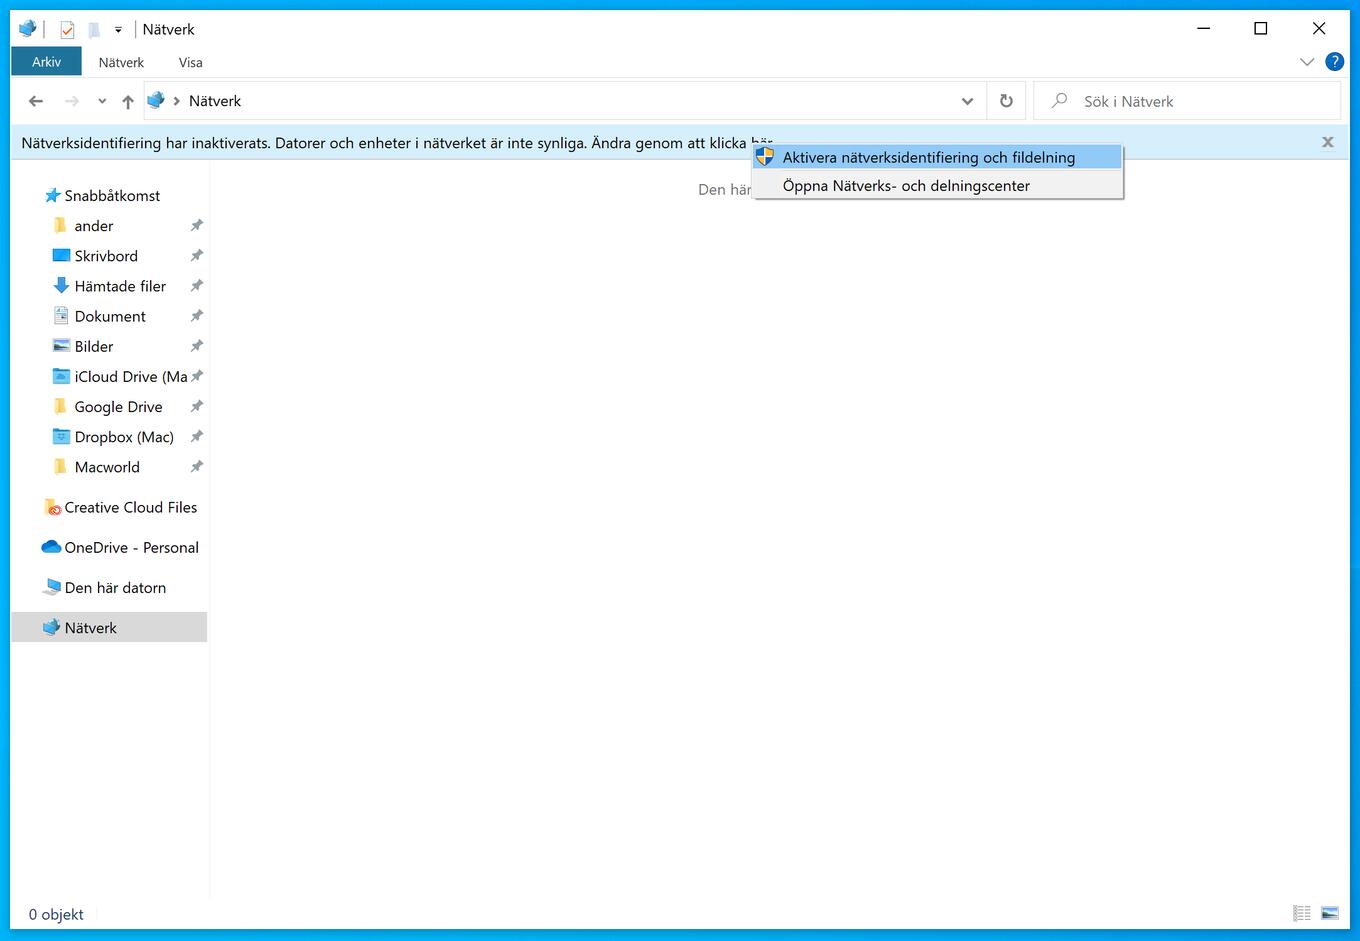
If Windows Explorer warns that network discovery is turned off, you can turn it on so that the server can be found automatically. Click on the warning and select Yes when asked if you want to activate it (You can find the setting below Advanced sharing settings control Board \\ raspberrypi. local
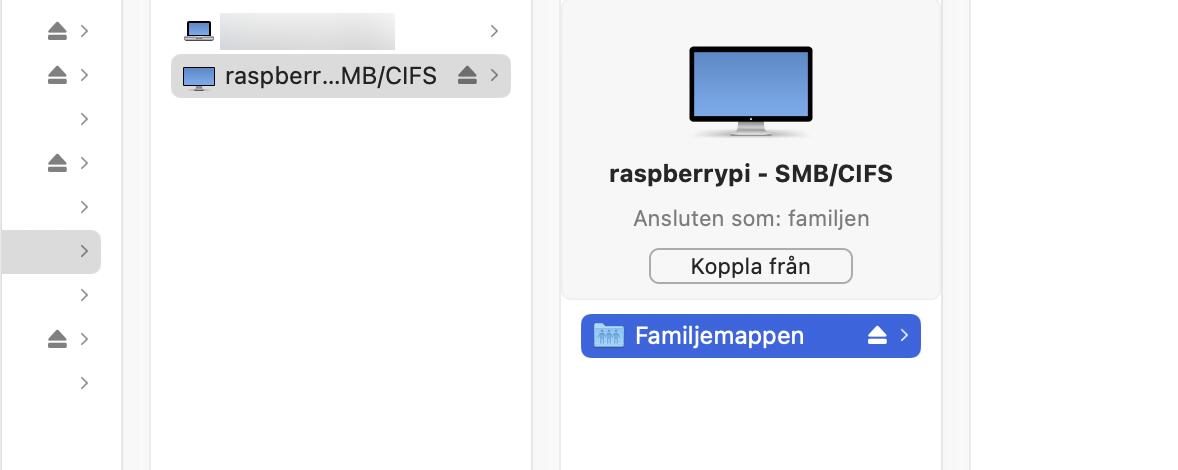
If you also have a Mac at home, do this: open discoverer network Connection Go, call the server poultice K smb://raspberrypi. local
Communication from a mobile phone
Built-in IOS app files browse button more Connect to the server
Some Android variants have a built-in file manager with smb support, but not all. If you can’t find it in your area, you can try eg CX File Explorer .
You can also connect directly from media player apps, such as VLC, to play videos, music, and more. If you don’t want to build a media server with Jellyfin or Plex, this can be a rudimentary way to store your media in a central location accessible to all family members.
Use as a backup server
The practical use of Raspberry Pi-nas is a central backup server for all the computers in the house. with a program arq backup redundant
accessed from the outside
Want to access your NAS server from the Internet? It works of course, but many popular technologies like port forwarding and upnp are hard to secure. Our recommendation if you want to is to run a vpn server in the router (using wireguard or openvpn) so you can connect to it and access your network through an encrypted tunnel. How to do this is too big a topic for this guide.
Anpassa dina inställningar
För att kunna visa innehållet behöver vi ditt godkännande. Om du inte fått möjlighet att godkänna kan det bero på ett tillfälligt fel hos oss eller att ett plugin till din webbläsare blockerar vår förfrågan.
Ladda om sidan eller inaktivera eventuella plugin i din webbläsare för att göra ditt val.
Du kan välja bort alla funktioner där din webbläsares aktivitet kan lagras för att direkt eller indirekt ge dig personligt anpassade annonser.
";info.appendChild(text);}}function loadHtmlContent(element){var consent=localStorage.getItem(window.IDG_CONSENT.storage.name);if((consent==window.IDG_CONSENT.storage.value.granted||(window.IDG_CONFIGURATION.consent_disable_modal&&consent==window.IDG_CONSENT.storage.value.limbo))&&!hasClass(element,configuration_status.lazy.html.approved)){var elementType=element.getAttribute("data-lazy-type");var lazyLoaded=document.createElement(elementType);if(element.getAttribute("style")!=null){element.removeAttribute("style");}for(var i=0;i-1){href=decodeURIComponent(param.replace("href="https://news.google.com/__i/rss/rd/articles/,""));break;}}var likeLink=document.createElement("a");likeLink.setAttribute("target"https://news.google.com/__i/rss/rd/articles/,"_blank");likeLink.setAttribute("rel"https://news.google.com/__i/rss/rd/articles/,"noopener");likeLink.setAttribute("href",href);likeLink.innerHTML="Gilla ";element.appendChild(likeLink);}else{var consentInformation=element.getAttribute("data-lazy-consent-info");var consentActionText=element.getAttribute("data-lazy-consent-customize");if(element.getAttribute("data-placeholder-state")!=="init"){initHtmlContentPlaceHolder(element);}var info=element.querySelectorAll(".consent-information")[0];info.innerHTML="";var text=document.createElement("div");text.setAttribute("class"https://news.google.com/__i/rss/rd/articles/,"consent-text");text.innerHTML=consentInformation;info.appendChild(text);var button=document.createElement("div");button.setAttribute("class"https://news.google.com/__i/rss/rd/articles/,"consent-button");button.innerHTML=consentActionText;info.appendChild(button);var consentInfoWrapper=element.querySelectorAll(".consent-information-container")[0];consentInfoWrapper.addEventListener("click",function(){document.dispatchEvent(new CustomEvent(window.IDG_CONFIGURATION.event.open.name,{response:"open consent modal"}));},false);consentInfoWrapper.appendChild(info);element.appendChild(consentInfoWrapper);}removeClass(element,configuration_status.lazy.html.approved);addClass(element,configuration_status.lazy.html.dissaproved);}}}function loadHTBContent(element){var source=element.getAttribute("data-source");if(source!==null&&source!==""){var articleTeaserWrapper=element.querySelector(".htb__inner");if(typeof articleTeaserWrapper!=="undefined"&&articleTeaserWrapper!==null){addClass(element,"loading");var htbXhr=new XMLHttpRequest();htbXhr.open("GET",source);htbXhr.crossDomain=true;htbXhr.onload=function(){try{var response=JSON.parse(htbXhr.responseText);var hasArticles=false;if(typeof response.articles!=="undefined"){for(var i in response.articles){if(response.articles.hasOwnProperty(i)){hasArticles=true;var article=response.articles[i];var articleElement=document.createElement("article");articleElement.setAttribute("class"https://news.google.com/__i/rss/rd/articles/,"htb__item");var articleLink=document.createElement("a");if(typeof article.topTeaserImageUrl!=="undefined"&&article.topTeaserImageUrl!==null&&article.topTeaserImageUrl.length>0){articleLink.setAttribute("style"https://news.google.com/__i/rss/rd/articles/,"background-image: url("+article.topTeaserImageUrl+")");}else{if(typeof article.teaserImageUrl!=="undefined"&&article.teaserImageUrl!==null&&article.teaserImageUrl.length>0){articleLink.setAttribute("style"https://news.google.com/__i/rss/rd/articles/,"background-image: url("+article.teaserImageUrl+")");}}articleLink.setAttribute("href",article.articleLink);articleLink.setAttribute("title",article.teaserTitle);var articleTitle=document.createElement("h3");articleTitle.innerHTML=article.teaserTitle;articleLink.appendChild(articleTitle);articleElement.appendChild(articleLink);var articleSkeleton=articleTeaserWrapper.querySelector(".htb__article-skeleton");if(typeof articleSkeleton!=="undefined"&&articleSkeleton!==null){articleSkeleton.replaceWith(articleElement);}else{articleTeaserWrapper.appendChild(articleElement);}}}}if(hasArticles){var footerWrapper=element.querySelector(".htb__footer");if(typeof footerWrapper!=="undefined"&&footerWrapper!==null&&hasClass(footerWrapper,"wwu-buttons")){var clickSettings={category:"Page Links",action:"To: ",label:"From: "+(window.dataLayer[0].headline.length>0?window.dataLayer[0].headline:window.dataLayer[0].property)+" → "+window.dataLayer[0].property+" → "+window.dataLayer[0].contentId};var returnurl="";var url=null;var canonicalUrl=document.querySelector("link[rel="canonical"]");if(typeof canonicalUrl!=="undefined"&&canonicalUrl!==null){url=canonicalUrl.getAttribute("href");if(!(typeof url!=="undefined"&&url!==null&&url.length>0&&url.indexOf(window.dataLayer[0].property)>-1)){url=null;}}if(url===null){var ogUrl=document.querySelector("meta[property='og:url']");if(typeof ogUrl!=="undefined"&&ogUrl!==null){url=ogUrl.getAttribute("content");}}if(typeof url!=="undefined"&&url!==null&&url.length>0){try{returnurl+="?return=";returnurl+=encodeURIComponent(url);}catch(err){returnurl="";}}var packageName="";var upgradeUrl=window.IDG_CONFIGURATION.account.page+window.IDG_CONFIGURATION.account.path_o;if(window.dataLayer[0].audience==="consumer"){upgradeUrl+=window.IDG_CONFIGURATION.account.path_o_consumer;packageName=window.IDG_CONFIGURATION.account.package_name_consumer+"-";}else{if(window.dataLayer[0].audience==="enterprise"){upgradeUrl+=window.IDG_CONFIGURATION.account.path_o_enterprise;packageName=window.IDG_CONFIGURATION.account.package_name_enterprise+"-";}}var upgradeTrUrl=upgradeUrl;upgradeUrl+=returnurl;if(window.dataLayer[0].view!=="in-app-ios"&&window.dataLayer[0].audience!=="consumer"){var upgradeLink=document.createElement("a");upgradeLink.setAttribute("href",upgradeUrl);upgradeLink.setAttribute("title"https://news.google.com/__i/rss/rd/articles/,"Bli "+packageName+"medlem");upgradeLink.innerHTML='Bli '+packageName+"medlem ";upgradeLink.addEventListener("click",function(e){if(typeof IDGTrackEvent!=="undefined"){IDGTrackEvent(clickSettings.category,clickSettings.action+upgradeTrUrl,clickSettings.label);}});footerWrapper.appendChild(upgradeLink);}var loginLink=document.createElement("a");loginLink.setAttribute("href",window.IDG_CONFIGURATION.account.page+window.IDG_CONFIGURATION.account.path_si+returnurl);loginLink.setAttribute("title"https://news.google.com/__i/rss/rd/articles/,"Logga in");loginLink.innerHTML='Logga in ';loginLink.addEventListener("click",function(e){if(typeof IDGTrackEvent!=="undefined"){IDGTrackEvent(clickSettings.category,clickSettings.action+window.IDG_CONFIGURATION.account.page+window.IDG_CONFIGURATION.account.path_si,clickSettings.label);}});footerWrapper.appendChild(loginLink);}removeClass(element,"loading");addClass(element,"loaded");}else{addClass(element,"failed--empty");}}catch(error){addClass(element,"failed-js");}};htbXhr.onerror=function(e){addClass(element,"failed-xhr");};htbXhr.send(null);}else{addClass(element,"failed--missing-wrapper");}}else{addClass(element,"failed--missing-source");}}function initiateFacebookPixel(){if(typeof window.IDG_CONFIGURATION.facebook_pixel!=="undefined"&&window.IDG_CONFIGURATION.facebook_pixel.enabled){!function(f,b,e,v,n,t,s){if(f.fbq){return;}n=f.fbq=function(){n.callMethod?n.callMethod.apply(n,arguments):n.queue.push(arguments);};if(!f._fbq){f._fbq=n;}n.push=n;n.loaded=!0;n.version="2.0";n.queue=[];t=b.createElement(e);t.async=!0;t.src=v;s=b.getElementsByTagName(e)[0];s.parentNode.insertBefore(t,s);}(window,document,"script",window.IDG_CONFIGURATION.facebook_pixel.source);for(var i in window.IDG_CONFIGURATION.facebook_pixel.ids){var id=window.IDG_CONFIGURATION.facebook_pixel.ids[i];if(id!=""){fbq("init",id);fbq("track"https://news.google.com/__i/rss/rd/articles/,"PageView");fbq("track"https://news.google.com/__i/rss/rd/articles/,"ViewContent");}}}}function initiateComscore(){var _comscore=_comscore||[];_comscore.push({c1:"2",c2:"6035308"}),function(){var a=document.createElement("script"),b=document.getElementsByTagName("script")[0];a.async=!0,a.src="https://sb.scorecardresearch.com/beacon.js",b.parentNode.insertBefore(a,b);}();}function initiatePermutive(){try{window.IDG_CONFIGURATION.permutive.debug=(window.location.href.indexOf("permutivedebug=true")>-1);}catch(err){window.IDG_CONFIGURATION.permutive.debug=false;window.IDG_CONFIGURATION.permutive.debug_error=err.message;}if(window.IDG_CONFIGURATION.permutive.debug){console.log("DEBUG Permutive enabled",window.IDG_CONFIGURATION.permutive.enabled);}if(window.IDG_CONFIGURATION.permutive.enabled){!function(n,e,o,r,i){if(!e){e=e||{},window.permutive=e,e.q=[],e.config=i||{},e.config.projectId=o,e.config.apiKey=r,e.config.environment=e.config.environment||"production";for(var t=["addon"https://news.google.com/__i/rss/rd/articles/,"identify"https://news.google.com/__i/rss/rd/articles/,"track"https://news.google.com/__i/rss/rd/articles/,"trigger"https://news.google.com/__i/rss/rd/articles/,"query"https://news.google.com/__i/rss/rd/articles/,"segment"https://news.google.com/__i/rss/rd/articles/,"segments"https://news.google.com/__i/rss/rd/articles/,"ready"https://news.google.com/__i/rss/rd/articles/,"on"https://news.google.com/__i/rss/rd/articles/,"once"https://news.google.com/__i/rss/rd/articles/,"user"https://news.google.com/__i/rss/rd/articles/,"consent"],c=0;c0){return date.replace(" "https://news.google.com/__i/rss/rd/articles/,"T")+":00Z";}return null;}function appendPermutiveAddon(pageDataLayer){var appendAddon=(window.IDG_CONFIGURATION.permutive.enabled&&typeof pageDataLayer!=="undefined"&&pageDataLayer!==null);if(window.IDG_CONFIGURATION.permutive.debug){console.log("DEBUG Permutive appendAddon",appendAddon);}if(appendAddon){var page={type:pageDataLayer.displayType,language:dataLayer[0].propertyCountry,tags:[],keywords:pageDataLayer.metaKeywords,audience:pageDataLayer.audience,description:pageDataLayer.metaDescription,gTax:{primaryIds:[],secondaryIds:[],},ads:{enabled:window.IDG_CONFIGURATION.ads.enabled}};if(typeof pageDataLayer.primaryChannel!=="undefined"&&pageDataLayer.primaryChannel.length>0){page.tags.push(pageDataLayer.primaryChannel);if(typeof window.IDG_CONFIGURATION.permutive.mapping[pageDataLayer.primaryChannel]!=="undefined"){page.gTax.primaryIds.push(window.IDG_CONFIGURATION.permutive.mapping[pageDataLayer.primaryChannel]);}}if(typeof pageDataLayer.secondaryChannels!=="undefined"&&pageDataLayer.secondaryChannels.length>0){for(var i in pageDataLayer.secondaryChannels){var current=pageDataLayer.secondaryChannels[i];page.tags.push(current);if(typeof window.IDG_CONFIGURATION.permutive.mapping[current]!=="undefined"){page.gTax.secondaryIds.push(window.IDG_CONFIGURATION.permutive.mapping[current]);}}}if(pageDataLayer.contentType==="home page"){page.type=pageDataLayer.contentType;}else{if(pageDataLayer.displayType==="article"){var article={type:pageDataLayer.contentType,title:pageDataLayer.headline,description:pageDataLayer.description,source:pageDataLayer.source,id:pageDataLayer.articleId,modifiedAt:formatPermutiveDate(pageDataLayer.dateUpdated),publishedAt:formatPermutiveDate(pageDataLayer.datePublished),authors:pageDataLayer.authors,isInsiderContent:(pageDataLayer.locked==="true")?true:false};page.article=article;}}permutive.addon("web",{page:page});if(window.IDG_CONFIGURATION.permutive.debug){console.log("DEBUG Permutive page",page);}}}function insertHeadFullScript(){if(typeof window.IDG_CONFIGURATION.auth!=="undefined"&&window.IDG_CONFIGURATION.auth.state==="ready"&&window.IDG_CONFIGURATION.async_sources.enabled&&typeof window.IDG_CONFIGURATION.async_sources.full.head!=="undefined"){if(window.IDG_CONFIGURATION.async_sources.full.head.source!=""){appendAsyncJSTag(window.IDG_CONFIGURATION.async_sources.full.head.source);}if(window.dataLayer[0].subscriber&&window.IDG_CONFIGURATION.async_sources.full.head.auth!=""){appendAsyncJSTag(window.IDG_CONFIGURATION.async_sources.full.head.auth);}if(!window.dataLayer[0].subscriber&&window.IDG_CONFIGURATION.async_sources.full.head.unauth!=""){appendAsyncJSTag(window.IDG_CONFIGURATION.async_sources.full.head.unauth);}}}function insertHeadLightScript(){if(typeof window.IDG_CONFIGURATION.auth!=="undefined"&&window.IDG_CONFIGURATION.auth.state==="ready"&&window.IDG_CONFIGURATION.async_sources.enabled&&typeof window.IDG_CONFIGURATION.async_sources.light.head!=="undefined"){if(window.IDG_CONFIGURATION.async_sources.light.head.source!=""){appendAsyncJSTag(window.IDG_CONFIGURATION.async_sources.light.head.source);}if(window.dataLayer[0].subscriber&&window.IDG_CONFIGURATION.async_sources.light.head.auth!=""){appendAsyncJSTag(window.IDG_CONFIGURATION.async_sources.light.head.auth);}if(!window.dataLayer[0].subscriber&&window.IDG_CONFIGURATION.async_sources.light.head.unauth!=""){appendAsyncJSTag(window.IDG_CONFIGURATION.async_sources.light.head.unauth);}}}function insertFooterFullScript(){if(typeof window.IDG_CONFIGURATION.auth!=="undefined"&&window.IDG_CONFIGURATION.auth.state==="ready"&&window.IDG_CONFIGURATION.async_sources.enabled&&typeof window.IDG_CONFIGURATION.async_sources.full.footer!=="undefined"){if(window.IDG_CONFIGURATION.async_sources.full.footer.source!=""){appendAsyncJSTagToBody(window.IDG_CONFIGURATION.async_sources.full.footer.source);}if(window.dataLayer[0].subscriber&&window.IDG_CONFIGURATION.async_sources.full.footer.auth!=""){appendAsyncJSTag(window.IDG_CONFIGURATION.async_sources.full.footer.auth);}if(!window.dataLayer[0].subscriber&&window.IDG_CONFIGURATION.async_sources.full.footer.unauth!=""){appendAsyncJSTag(window.IDG_CONFIGURATION.async_sources.full.footer.unauth);}}else{window.IDG_CONFIGURATION.async_sources.full.footer.waiting=true;}}function insertFooterLightScript(){if(typeof window.IDG_CONFIGURATION.auth!=="undefined"&&window.IDG_CONFIGURATION.auth.state==="ready"&&window.IDG_CONFIGURATION.async_sources.enabled&&typeof window.IDG_CONFIGURATION.async_sources.light.footer!=="undefined"){if(window.IDG_CONFIGURATION.async_sources.light.footer.source!=""){appendAsyncJSTagToBody(window.IDG_CONFIGURATION.async_sources.light.footer.source);}if(window.dataLayer[0].subscriber&&window.IDG_CONFIGURATION.async_sources.light.footer.auth!=""){appendAsyncJSTag(window.IDG_CONFIGURATION.async_sources.light.footer.auth);}if(!window.dataLayer[0].subscriber&&window.IDG_CONFIGURATION.async_sources.light.footer.unauth!=""){appendAsyncJSTag(window.IDG_CONFIGURATION.async_sources.light.footer.unauth);}}else{window.IDG_CONFIGURATION.async_sources.light.footer.waiting=true;}}function insertSponsoredPixel(articleElement){if(typeof articleElement!=="undefined"&&articleElement!=null){if(hasClass(articleElement,"sparticle")&&!hasClass(articleElement,"sptarticle")){updateSponsorTracking(articleElement,articleElement.getAttribute("data-article-sp-dcui"),articleElement.getAttribute("data-article-sp-dcseg"),articleElement.getAttribute("data-article-sp-iframe-name"),articleElement.getAttribute("data-article-sp-iframe-src"));}}}function loadTTDFrames(element){var ttdFrames=element.querySelectorAll(".ttd-frame");var ttdFramesSize=ttdFrames.length;for(var i=0;i0&&typeof configuration_status.vibrant[name]!=="undefined"){var id=configuration_status.vibrant[name];(function(d,s,host,ipid){var e=d.createElement(s);e.type="application/javascript";e.async=!0;e.src="https://"+host+"/intellitxt/front.asp?ipid="+ipid;d.getElementsByTagName(s)[0].parentNode.appendChild(e);})(document,"script"https://news.google.com/__i/rss/rd/articles/,"k.intellitxt.com",id);}}}var pbjs=pbjs||{};pbjs.que=pbjs.que||[];var googletag=googletag||{};googletag.cmd=googletag.cmd||[];if(configuration_status.ab_test.enable){var group=localStorage.getItem(configuration_status.ab_test.name);if(configuration_status.ab_test.activate.indexOf(group)>-1&&typeof configuration_status.ab_test.modal.matching_config[group]!=="undefined"){var currentConfig=configuration_status.ab_test.modal.matching_config[group];window.IDG_CONFIGURATION.consent_disable_modal=currentConfig.consent_disable_modal;}else{window.IDG_CONFIGURATION.consent_disable_modal=configuration_status.ab_test.modal.none_matching_value.consent_disable_modal;}}else{window.IDG_CONFIGURATION.consent_disable_modal=configuration_status.ab_test.modal.default_value.consent_disable_modal;}if(window.IDG_CONFIGURATION.consent_disable_modal){document.addEventListener(window.IDG_CONFIGURATION.event.limbo.name,function(e){window.IDG_CONFIGURATION.event.limbo.dispatched=true;initiateConsentDependenciesHead();});}window.IDG_CONFIGURATION.consent_response_box={enable:true};if(window.location.hostname==="idgsverige.se"){window.IDG_CONFIGURATION.consent_domain="idgsverige.se";}window.IDG_CONFIGURATION.consent_state_ready="init";setTimeout(function(){window.IDG_CONFIGURATION.consent_state_ready=false;if(!window.IDG_CONFIGURATION.consent_state_ready){var waitingHtmlTargets=document.querySelectorAll("."+configuration_status.lazy.html.waiting);for(var i in waitingHtmlTargets){var target=waitingHtmlTargets[i];if(typeof target==="object"){loadHtmlWaiting(target);}}}},configuration_status.consent_timeout);document.addEventListener(window.IDG_CONFIGURATION.event.stored.name,function(e){window.IDG_CONFIGURATION.event.stored.dispatched=true;window.IDG_CONFIGURATION.event.stored.value=localStorage.getItem(window.IDG_CONSENT.storage.name);initiateConsentDependenciesHead();});document.addEventListener(window.IDG_CONFIGURATION.event.action.name,function(e){window.IDG_CONFIGURATION.event.action.dispatched=true;initiateConsentDependencies();});document.addEventListener(window.IDG_CONFIGURATION.event.response.name,function(e){window.IDG_CONFIGURATION.event.response.dispatched=true;});document.addEventListener("lazybeforeunveil",function(e){var lazyTarget=e.target;var classNames=lazyTarget.getAttribute("class");if(typeof classNames!=="undefined"&&classNames!==null){if(hasClass(lazyTarget,"lazy-ad-container")||hasClass(lazyTarget,"ads-container")){if(typeof window.IDG_CONFIGURATION!=="undefined"&&window.IDG_CONFIGURATION.ads.status===configuration_status.done){loadNewPageAds(lazyTarget,lazyTarget.getAttribute("data-page"),lazyTarget.getAttribute("data-selector"));}else{addClass(lazyTarget,configuration_status.lazy.ad.waiting);}}else{if(hasClass(lazyTarget,"lazy-html-container")){if(window.IDG_CONFIGURATION.event.stored.dispatched||(window.IDG_CONFIGURATION.consent_disable_modal&&window.IDG_CONFIGURATION.event.limbo.dispatched)||window.IDG_CONFIGURATION.event.action.dispatched){loadHtmlContent(lazyTarget);}else{loadHtmlWaiting(lazyTarget);}}else{if(hasClass(lazyTarget,"lazy-htb")){loadHTBContent(lazyTarget);}}}}if(configuration_status.custom_lazy_event.active){setTimeout(function(){document.dispatchEvent(new CustomEvent(configuration_status.custom_lazy_event.name,{detail:{target:lazyTarget}}));},100);}});if(typeof window.NSPT!=="undefined"){var nsptId=getUrlParameter("prx_t");if(nsptId.length<=0){var parts=location.href.replace(location.search,"").split("partner/");if(parts.length>1){nsptId=parts[1].replace(/\/|\s/g,"");}}if(nsptId.length<=0){nsptId="nspt";}var nsptSource=window.NSPT.d;nsptSource+="/";nsptSource+=window.NSPT.g;nsptSource+="/";nsptSource+=nsptId;nsptSource+="/pis.gif";var nsptPixel=document.createElement("img");nsptPixel.src=nsptSource;nsptPixel.width=1;nsptPixel.height=1;nsptPixel.style="display:none;";nsptPixel.onload=function(){aiOnLoad();};if(typeof document.body==="undefined"||document.body===null){document.documentElement.appendChild(nsptPixel);}else{nsptPixel,document.body.appendChild(nsptPixel);}}function articleBodyReady(articleIndex,articlePageClass,articleId,isSponsored){var articleBodyReadyIdentifier=articlePageClass+"_"+articleId;if(!(configuration_status.articleBodyReady.indexOf(articleBodyReadyIdentifier)>-1)){if(articleIndex==1){window.firstarticlebodyloaded=true;}configuration_status.articleBodyReady.push(articleBodyReadyIdentifier);document.dispatchEvent(new CustomEvent("articlebodyloaded",{detail:{articleIdNo:articleIndex,articleClass:articlePageClass,articleId:articleId,articleSponsored:isSponsored}}));if(typeof window.IDG_CONFIGURATION.auth&&typeof window.IDG_CONFIGURATION.auth.user!=="undefined"&&typeof window.IDG_CONFIGURATION.auth.user.saved_articles!=="undefined"&&window.IDG_CONFIGURATION.auth.user.saved_articles.length>0){for(var i in window.IDG_CONFIGURATION.auth.user.saved_articles){var articleElement=document.querySelector(".page-"+articleIndex);if(articleElement!==null){if(window.IDG_CONFIGURATION.auth.user.saved_articles[i].article_id===articleElement.getAttribute("data-article-id")){if(!hasClass(articleElement,"article--bookmarked")){addClass(articleElement,"article--bookmarked");}}}}}}}function unauthFeatureLayer(config){var currentLayer=window.dataLayer[0];var parentElement=null;if(typeof config.id!=="undefined"){parentElement=document.querySelector('div[data-article-id="'+config.id+'"]');for(var i in window.dataLayer){if(typeof window.dataLayer[i]!=="function"&&typeof window.dataLayer[i].articleId!=="undefined"&&window.dataLayer[i].articleId===config.id){currentLayer=window.dataLayer[i];break;}}}if(parentElement===null){parentElement=document;}var clickSettings={category:"Paywall Layer",label:"From: "+(typeof currentLayer.headline!=="undefined"&¤tLayer.headline.length>0?currentLayer.headline:currentLayer.property)+" → "+config.layer_class+" → "+currentLayer.property+" → "+currentLayer.contentId,action:"To: "};var layer=parentElement.querySelector("."+config.layer_class);if(layer===null){var userExists=(typeof window.IDG_CONFIGURATION.auth!=="undefined"&&typeof window.IDG_CONFIGURATION.auth.user!=="undefined");var returnurl="";if(typeof config.url!=="undefined"&&config.url!==null){try{returnurl+="?return=";var currenturl=config.url;if(currenturl.indexOf("http://")>-1){currenturl=currenturl.replace("http://"https://news.google.com/__i/rss/rd/articles/,"https://");}returnurl+=encodeURIComponent(currenturl);}catch(err){returnurl="";}}var packageName="";var upgradeUrl=window.IDG_CONFIGURATION.account.page+window.IDG_CONFIGURATION.account.path_o;if(window.dataLayer[0].audience==="consumer"){upgradeUrl+=window.IDG_CONFIGURATION.account.path_o_consumer;packageName=window.IDG_CONFIGURATION.account.package_name_consumer+"-";}else{if(window.dataLayer[0].audience==="enterprise"){upgradeUrl+=window.IDG_CONFIGURATION.account.path_o_enterprise;packageName=window.IDG_CONFIGURATION.account.package_name_enterprise+"-";}}var upgradeTrUrl=upgradeUrl;upgradeUrl+=returnurl;var wrapper=document.createElement("div");wrapper.setAttribute("class"https://news.google.com/__i/rss/rd/articles/,"wwu "+config.layer_class+" visible");var headline=document.createElement("h5");headline.setAttribute("class"https://news.google.com/__i/rss/rd/articles/,"wwu__head");if(window.dataLayer[0].view==="in-app-ios"){headline.innerHTML=(userExists?config.view_headline.existing_user:config.view_headline.new_user).replace(/{packageName}/g,packageName);}else{headline.innerHTML=(userExists?config.headline.existing_user:config.headline.new_user).replace(/{packageName}/g,packageName);}wrapper.appendChild(headline);var info=document.createElement("div");info.setAttribute("class"https://news.google.com/__i/rss/rd/articles/,"wwu__lead");if(window.dataLayer[0].view==="in-app-ios"){info.innerHTML=(userExists?config.view_lead.existing_user:config.view_lead.new_user).replace(/{packageName}/g,packageName);}else{info.innerHTML=(userExists?config.lead.existing_user:config.lead.new_user).replace(/{packageName}/g,packageName);}wrapper.appendChild(info);if(!userExists){var loginLink=document.createElement("a");loginLink.setAttribute("href",window.IDG_CONFIGURATION.account.page+window.IDG_CONFIGURATION.account.path_si+returnurl);loginLink.setAttribute("title"https://news.google.com/__i/rss/rd/articles/,"Logga in");loginLink.innerHTML='Logga in ';loginLink.addEventListener("click",function(e){if(typeof IDGTrackEvent!=="undefined"){IDGTrackEvent(clickSettings.category,clickSettings.action+window.IDG_CONFIGURATION.account.page+window.IDG_CONFIGURATION.account.path_si,clickSettings.label);}});wrapper.appendChild(loginLink);}if(window.dataLayer[0].view!=="in-app-ios"&&window.dataLayer[0].audience!=="consumer"){var upgradeLink=document.createElement("a");upgradeLink.setAttribute("href",upgradeUrl);upgradeLink.setAttribute("title"https://news.google.com/__i/rss/rd/articles/,"Bli "+packageName+"medlem");upgradeLink.innerHTML='Bli '+packageName+"medlem ";upgradeLink.addEventListener("click",function(e){if(typeof IDGTrackEvent!=="undefined"){IDGTrackEvent(clickSettings.category,clickSettings.action+upgradeTrUrl,clickSettings.label);}});wrapper.appendChild(upgradeLink);}var closeWrapper=document.createElement("div");closeWrapper.setAttribute("class"https://news.google.com/__i/rss/rd/articles/,"wwu__close");closeWrapper.innerHTML='support.idg.se ';}else{lead.innerHTML="Som "+iosPackageName+"-medlem läser du artiklar obegränsat.";}}var primaryButton=response.querySelector("button[data-auth]");if(primaryButton!==null){primaryButton.parentNode.removeChild(primaryButton);}if(!userExists){var secondaryButton=response.querySelector(".wwu__btn--secondary");if(secondaryButton!==null){removeClass(secondaryButton,"wwu__btn--secondary");addClass(secondaryButton,"wwu__btn--primary");}}}catch(err){}}var responseButtons=response.querySelectorAll(".wwu__btn");for(var i in responseButtons){try{var current=responseButtons[i];if(typeof current==="object"){var clickElement=current;var listener=current.getAttribute("data-listener");if(!(listener!==null&&typeof listener!=="undefined")){var parentLink=current.parentElement;if(parentLink!==null&&parentLink.tagName==="A"){clickElement=parentLink;try{var href=clickElement.getAttribute("href");if(href!==null&&href.indexOf("return=http")>-1&&href.indexOf("return=https")<0){clickElement.setAttribute("href",href.replace("return=http"https://news.google.com/__i/rss/rd/articles/,"return=https"));}}catch(error){}}clickElement.addEventListener("click",function(e){var button=e.target;if(e.target.tagName==="A"){button=e.target.querySelector("button");}if(typeof IDGTrackEvent!=="undefined"){IDGTrackEvent(clickSettings.category,clickSettings.action+button.innerText,clickSettings.label);}});}}}catch(err){}}var responseLinks=response.querySelectorAll("a[data-member-link]");for(var i in responseLinks){try{var current=responseLinks[i];if(typeof current==="object"){var linkElement=current;var href=window.IDG_CONFIGURATION.account.page+linkElement.getAttribute("data-member-link");if(href!==null&&!(href.indexOf("return=")>-1)&&returnurl!==null&&returnurl.length>0){href+=(href.indexOf("?")>=0?"&":"?");href+="return=";href+=returnurl;}linkElement.setAttribute("href",href);linkElement.addEventListener("click",function(e){if(typeof IDGTrackEvent!=="undefined"){IDGTrackEvent(clickSettings.category,clickSettings.action+e.target.innerText,clickSettings.label);}});}}catch(err){}}return response;}function loadLockedArticleHtml(lockedId,lockedPageNumber,lockedPageSelector){var pageNum=1;try{var regexp=/(\/sida\/)([0-9]{1,3})/g;var match=regexp.exec(window.location.href);if(match!=null){var num=parseInt(match[2],10);if(num>=1){pageNum=num;}}}catch(err){}var articleUrl=window.IDG_CONFIGURATION.account.source;articleUrl+=window.IDG_CONFIGURATION.account.path_ar;articleUrl+="/";articleUrl+=lockedId;articleUrl+="/";articleUrl+=pageNum;var lockedXhr=new XMLHttpRequest();lockedXhr.open("GET",articleUrl);lockedXhr.withCredentials=true;lockedXhr.crossDomain=true;lockedXhr.onload=function(){var hasError=false;try{var data=lockedXhr.responseText;var code=data.replace(/document.write/gi,"console.error");var wrapper=document.createElement("div");wrapper.innerHTML=code;var response=wrapper.firstElementChild.cloneNode(true);if(typeof response!=="undefined"&&response!==null){var access=hasClass(response,window.IDG_CONFIGURATION.premium.access);hasError=hasClass(response,"error");var dataUser=response.getAttribute("data-user");if(typeof dataUser!=="undefined"&&dataUser!==null&&dataUser.length>0){var user=JSON.parse(dataUser.replace(/\'/g,'"'));window.IDG_CONFIGURATION.auth.user=user;if(typeof user.packages!=="undefined"){window.IDG_CONFIGURATION.auth.packages=user.packages;}}if(!access){response=prepareLockedInfo(lockedId,lockedPageNumber,lockedPageSelector,response);}if(hasError){response=prepareLockedErrorInfo(lockedId,articleUrl,response,null,null,lockedXhr,"lockedXhr onload hasError");}if(typeof response!=="undefined"&&response!==null){var articleElement=document.getElementsByClassName("page-"+lockedPageNumber)[0];if(typeof articleElement!=="undefined"){var lockedColumn=articleElement.getElementsByClassName("divColumn1Article");if(typeof lockedColumn!=="undefined"&&lockedColumn.length>0){lockedColumn[0].replaceWith(response);if(response.getAttribute("data-unlocked-first-page")==="true"){addClass(articleElement,"article-premium--intro");}if(access){addClass(articleElement,window.IDG_CONFIGURATION.premium.unlocked);removeClass(articleElement,window.IDG_CONFIGURATION.premium.locked);addImageTracker("https://ax.idg.se/ko01/"+lockedId+"-unlock/pis.gif",articleElement);}else{addClass(articleElement,window.IDG_CONFIGURATION.premium.locked);addImageTracker("https://ax.idg.se/ko01/"+lockedId+"-wwu/pis.gif",articleElement);}removeClass(articleElement,window.IDG_CONFIGURATION.premium.loading);articleBodyReady(lockedPageNumber,lockedPageSelector,lockedId,hasClass(articleElement,"sparticle"));}else{window.lockedArticleBody=response;if(access){addImageTracker("https://ax.idg.se/ko01/"+lockedId+"-unlock/pis.gif",document.body);}else{addImageTracker("https://ax.idg.se/ko01/"+lockedId+"-wwu/pis.gif",document.body);}}}else{window.lockedArticleBody=response;if(access){addImageTracker("https://ax.idg.se/ko01/"+lockedId+"-unlock/pis.gif",document.body);}else{addImageTracker("https://ax.idg.se/ko01/"+lockedId+"-wwu/pis.gif",document.body);}}}else{unhandledLockedError(lockedId,lockedPageNumber,articleUrl,"Missing required response to render",null,lockedXhr,"lockedXhr onload handling response");}}else{unhandledLockedError(lockedId,lockedPageNumber,articleUrl,"Missing required response to render",null,lockedXhr,"lockedXhr onload response");}}catch(error){if(hasError){unhandledLockedError(lockedId,lockedPageNumber,articleUrl,error.message,(error.stack||error.stacktrace),lockedXhr,"lockedXhr onload catch hasError");}else{accountError(lockedId,articleUrl,null,error.message,(error.stack||error.stacktrace),lockedXhr,"lockedXhr onload catch");}}finally{authReady(lockedPageNumber);}};lockedXhr.onerror=function(e){unhandledLockedError(lockedId,lockedPageNumber,articleUrl,e.message,(e.stack||e.stacktrace),lockedXhr,"lockedXhr onerror");authReady(lockedPageNumber);};lockedXhr.send(null);}if(window.dataLayer[0].locked==="true"&&window.dataLayer[0].unlockedByTime!=="true"&&(window.dataLayer[0].pageNumber!=="1"||(window.dataLayer[0].pageNumber==="1"&&window.dataLayer[0].lockedFirstPage==="true"))){loadLockedArticleHtml(window.dataLayer[0].articleId,1,"page-1");}else{if(window.IDG_CONFIGURATION.account.enabled){var authXhr=new XMLHttpRequest();authXhr.open("GET",window.IDG_CONFIGURATION.account.source+window.IDG_CONFIGURATION.account.path_au);authXhr.withCredentials=true;authXhr.crossDomain=true;authXhr.onload=function(){try{var response=JSON.parse(authXhr.responseText);if(typeof response.error!=="undefined"){accountError(null,window.IDG_CONFIGURATION.account.source+window.IDG_CONFIGURATION.account.path_au,null,response.message,null,authXhr,"authXhr onload response.error");}else{if(response.success&&typeof response.user!=="undefined"){window.IDG_CONFIGURATION.auth.user=response.user;if(typeof response.user.packages!=="undefined"){window.IDG_CONFIGURATION.auth.packages=response.user.packages;}}}}catch(error){accountError(null,window.IDG_CONFIGURATION.account.source+window.IDG_CONFIGURATION.account.path_au,null,error.message,(error.stack||error.stacktrace),authXhr,"authXhr onload catch");}finally{authReady(1);}};authXhr.onerror=function(e){accountError(null,window.IDG_CONFIGURATION.account.source+window.IDG_CONFIGURATION.account.path_au,null,e.message,(e.stack||e.stacktrace),authXhr,"authXhr onerror");authReady(1);};authXhr.send(null);}else{window.IDG_CONFIGURATION.auth.state="ready";window.IDG_CONFIGURATION.waiting_auth=false;gaPageView(1);ioPageView(dataLayer[0]);}}if(window.location.href.indexOf("tooltip=welcome")>-1){document.documentElement.classList.add("idg-konto-tip--active");setTimeout(function(){removeClass(document.documentElement,"idg-konto-tip--active");},4000);}
“Entrepreneur. Freelance introvert. Creator. Passionate reader. Certified beer ninja. Food nerd.”
Continue Reading






More Stories
Logitech Steering Wheel News: New Steering Wheels, Gear Lever, and Handbrake in Direct Drive Series
Garmin Launches inReach Messenger Plus App
Why Rare Earth Metals for Electric Cars Are Crucial for Modern Mobility